Ultimate Counter Sink Installation Checklist: Essential Steps for a Flawless Outcome
When it comes to achieving a seamless kitchen or bathroom experience, the installation of a counter sink is critical. According to a recent report by the National Kitchen and Bath Association, nearly 70% of homeowners consider the functionality and aesthetics of sink installations to be a primary concern during renovations. A well-executed counter sink can enhance both the look and efficiency of a space, contributing to a 30% increase in user satisfaction post-renovation. With such significant impacts on home design and usage, following a comprehensive installation checklist ensures that every aspect of the counter sink setup is addressed, leading to a flawless outcome. This blog will guide you through essential steps that will not only save you time and money but also ensure that your counter sink installation meets the highest standards in the industry.
Choosing the Right Counter Sink: Materials and Styles Explained
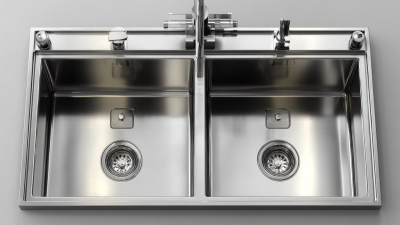
When it comes to choosing the right countertop sink, understanding the materials and styles available is essential for creating a harmonious kitchen space. Different materials, like stainless steel, porcelain, and composite sinks, can greatly influence the overall aesthetic and functionality of your kitchen. For instance, a stainless steel sink might be the ideal choice for a contemporary kitchen due to its sleek look and durability, while a ceramic option can add a classic charm, reminiscent of farmhouse designs. Consideration of how these materials interact with your countertop is critical, especially if you have chosen colors or patterns that can either complement or clash with the sink.
It’s also worth noting the trends in countertop colors, as they can significantly affect the perception of space in a kitchen. Light countertops can make a small kitchen appear larger and brighter, whereas darker options tend to add a touch of elegance and warmth. Interior designers recommend balancing the sink style and table color to achieve a cohesive look. Whether you're inspired by the clean lines of a modern space or the rustic feel of a country kitchen, selecting the right combination of sink material and countertop color will elevate your kitchen design while ensuring practicality.
Essential Tools Needed for a Successful Counter Sink Installation
When embarking on a counter sink installation, having the right tools is paramount to achieving a flawless outcome. A study by the Home Improvement Research Institute indicates that nearly 70% of DIY projects fail due to inadequate preparation and improper tool selection. Essential tools for this task include a high-quality counter sink drill bit, a level, a measuring tape, and a dependable power drill. These items ensure that your sink is mounted securely and evenly, which is critical to preventing leaks and ensuring long-term functionality.
In addition to the basic tools, it's beneficial to include silicone sealant, a caulk gun, and a wrench in your toolkit. According to a report by the National Kitchen and Bath Association, homeowners who use sealants properly can reduce plumbing issues by over 30%. This not only protects your investments but also enhances the aesthetic appeal of your installation. Properly equipped and informed, you can elevate your sink installation project from mediocre to professional-grade, ensuring both durability and visual appeal.

Step-by-Step Guide to Proper Counter Sink Placement
When it comes to proper counter sink placement, following a systematic approach is crucial for achieving a flawless installation. Start by carefully measuring the space on your countertop where the sink will go. This involves not only taking precise dimensions but also considering the overall layout of your kitchen, including potential obstacles like plumbing or electrical fixtures. Ensuring that you have adequate space will mean that the sink fits perfectly and functions well within the designed area.
Next, mark your cutting line accurately based on the measurements you've taken. A clean cut is vital to avoid any unnecessary damage to the countertop. Using a level to align your markings ensures that the sink will sit evenly, preventing future complications like water pooling or draining issues. Once the hole is cut, dry fit the sink to confirm everything aligns as planned. This step-by-step procedure will help you avoid common pitfalls, ensuring that your counter sink installation is both aesthetically pleasing and functional.
Counter Sink Installation Steps Progress
Common Mistakes to Avoid During Counter Sink Installation
When undertaking a counter sink installation, avoiding common mistakes can save you time and ensure a flawless outcome. One frequent error occurs during the measurement phase. Miscalculating dimensions or failing to account for the sink’s depth can lead to significant adjustments later on. Always double-check your measurements and consider using a template to ensure precision.
Another crucial tip is to pay attention to the sealing process. Many installers rush through applying the caulk, which can result in leaks and water damage over time. Make sure to apply an even bead of silicone sealant around the edges of the sink and allow it to cure properly before attaching the fittings. It's worth taking the time to do this step right the first time.
Lastly, neglecting to secure the counter sink properly can lead to shifting or instability. Use adequate fasteners and support brackets as needed. This will enhance the durability of your installation and prevent future issues. Always revisit your installation checklist to ensure each step is completed with care.
Final Touches: Ensuring a Seamless Finish for Your Counter Sink
When it comes to installing a counter sink, the final touches are crucial in ensuring a seamless and polished finish. After the primary installation steps are completed, it’s essential to focus on the details that can make or break the overall appearance of your sink. Begin by carefully inspecting the seams between the sink and the countertop, ensuring they are even and free of gaps. Applying a high-quality silicone sealant not only provides a waterproof barrier but also adds to the aesthetic appeal by offering a clean transition between surfaces.
Next, attention should be given to the sink's mounting hardware and fixtures. Ensure that all screws and brackets are tightened properly to avoid any wobble or movement, which can lead to wear over time. Additionally, consider the alignment of the faucet and any other installed features. A well-aligned faucet enhances usability and complements the sink’s design.
Finally, a thorough cleaning of the sink and surrounding area can really elevate the installation, removing dust and debris that might distract from the newly installed fixture. Taking these final steps will not only guarantee a flawless outcome but also provide long-lasting satisfaction with your beautifully finished counter sink.